Switchboard
This page describes the configuration needed to have a switchboard on your XiVO.
Overview
Switchboard functionality is available in the XiVO client. The goal of this page is to explain how to configure your switchboard and how to use it.
The switchboard xlet and profile allow an operator to view incoming calls, answer them, put calls on hold, view the calls on hold and pick up the calls on hold.
Limitations
Note
The shortcut keys of the switchboard do not work on the Mac version of the XiVO client.
Note
The enter shortcut to answer a call will not work if the focus is currently on a widget that will consume the key press. ie: a text field, a drop down
Note
The call center statistics are not applicable to the switchboard queues. The only valid counter is the ‘received’ calls counter.
Configuration
Quick Summary
In order to configure a switchboard on your XiVO, you need to:
- Create a queue for your switchboard
- Create a queue for your switchboard’s calls on hold
- Create the users that will be operators
- Activate the switchboard option for your phone
- Create an agent for your user
- Assign the incoming calls to the switchboard queue
- For each operator, add a function key for logging in or logging out from the switchboard queue.
- Set “no answer” destinations on the switchboard queue
Supported Devices
The supported phones for the switchboard are:
| Brand | Model | XiVO version | Plugin version |
|---|---|---|---|
| Aastra | 6755i | >= 14.07 | >= xivo-aastra-3.3.1-SP2, v1.0 |
| Aastra | 6757i | >= 14.07 | >= xivo-aastra-3.3.1-SP2, v1.0 |
| Aastra | 6735i | >= 14.07 | >= xivo-aastra-3.3.1-SP2, v1.2 |
| Aastra | 6737i | >= 14.07 | >= xivo-aastra-3.3.1-SP2, v1.2 |
| Polycom | VVX 400 | >= 15.11 | >= xivo-polycom-5.3.0, v1.3 |
| Polycom | VVX 410 | >= 15.11 | >= xivo-polycom-5.3.0, v1.3 |
| Snom | 720 | >= 14.14 | >= xivo-snom-8.7.3.25.5, v1.0 |
| Snom | D725 | >= 14.14 | >= xivo-snom-8.7.5.17, v1.4 |
| Yealink | T46G | >= 15.01 | >= xivo-yealink-72.0, v1.22.1 |
Create a Queue for Your Switchboard
All calls to the switchboard will first be distributed to a switchboard queue.
To create this queue, go to and click the add button.
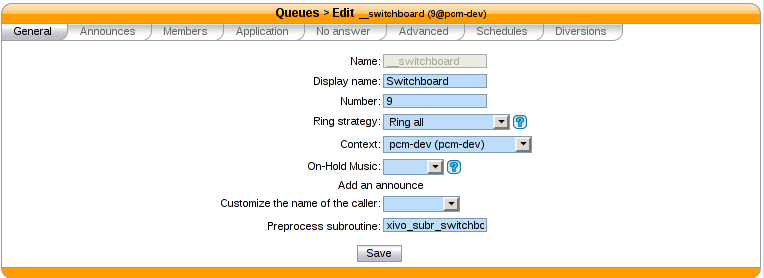
The following configuration is mandatory
- The field has to be __switchboard
- The field has to be Ring all
- The field has to be xivo_subr_switchboard
- The option has to be enabled
- The option has to be enabled
- The option has to be disabled
- The option has to be 1 second
- The option has to be disabled
- The option has to be disabled
- The option has to be No
Other important fields
- The field is the name displayed in the XiVO client xlets and in the statistics
- The field is the number that will be used to reach the switchboard internally (typically 9)
Create a Queue for Your Switchboard on Hold
The switchboard uses a queue to track its calls on hold.
To create this queue, go to and click the add button.
The following configuration is mandatory
- The field has to be __switchboard_hold
- The field has to be a valid number in a context reachable by the switchboard
Other important fields
- The field is the name displayed in the XiVO client xlets and in the statistics
Warning
This queue MUST have NO members
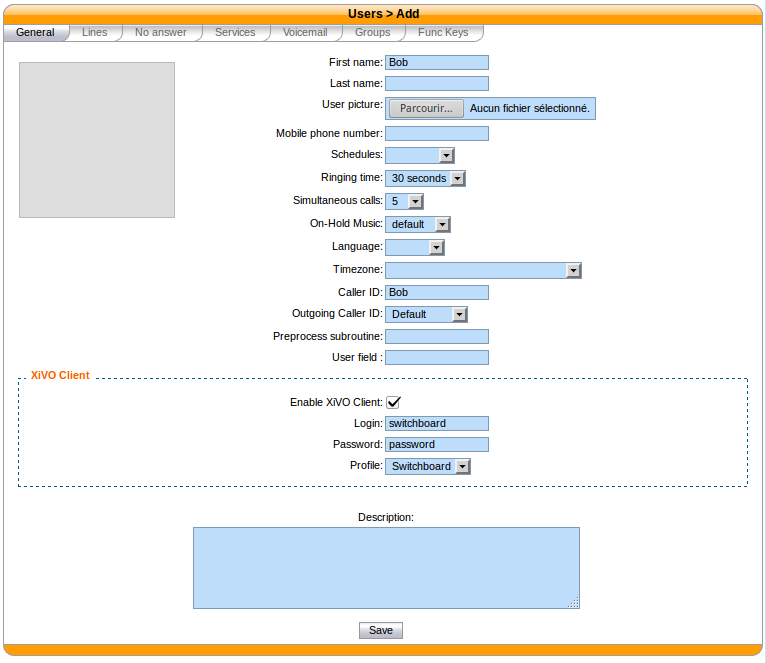
Create the Users that Will be Operators
Each operator needs to have a user configured with a line. The XiVO client profile has to be set to Switchboard.
The following configuration is mandatory for switchboard users
- The field has to be set
- The option has to be enabled
- The field has to be set
- The field has to be set
- The field has to be set to Switchboard
- The field has to have a valid extension
- The field has to be a supported device
- The option has to be enabled
- The option has to be enabled
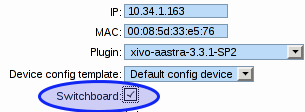
Activate the Switchboard Option for your Phone
The switchboard option must be activated on the phone. It’s possible to activate this option only on supported phones and plugins.
- Edit device associated to your user in
- Check the switchboard checkbox and save
- Synchronize your phone to apply the changes
Polycom Phones
To be able to use a Polycom phone for the switchboard, the XiVO must be able to do HTTP requests to the phone. This might be problematic if there’s a NAT between your XiVO and your phone.
It’s possible to configure the Polycom switchboard via the configuration files of xivo-ctid. The following options are available:
switchboard_polycom:
    username: xivo_switchboard
    password: xivo_switchboard
    answer_delay: 0.5
You will also need to change the XML API username/password by creating a custom template for your phone.
Snom Phones
When using a Snom switchboard, you must not configure a function key on position 1.
To be able to use a Snom phone for the switchboard, the XiVO must be able to do HTTP requests to
the phone. This might be problematic if there’s a NAT between your XiVO and your phone. The
following command should work from your XiVO’s bash command line wget http://guest:guest@<phone IP
address>/command.htm?key=SPEAKER. If this command does not activate the phone’s speaker, your
network configuration will have to be fixed before you can use the Snom switchboard.
It’s possible to configure the Snom switchboard via the configuration files of xivo-ctid. The following options are available:
switchboard_snom:
    username: guest
    password: guest
    answer_delay: 0.5
You have to change the username and password option if you have changed the administrator username or administrator password for your phone in .
Create an Agent for the Operator
Each operator needs to have an associated agent.
Warning
Each agent MUST ONLY be a member of the Switchboard queue
To create an agent:
- Go to
- Click on the group default
- Click on the Add button
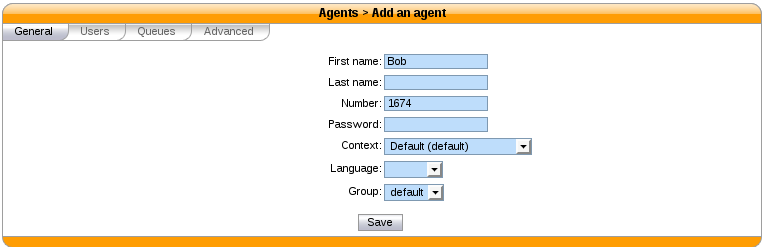
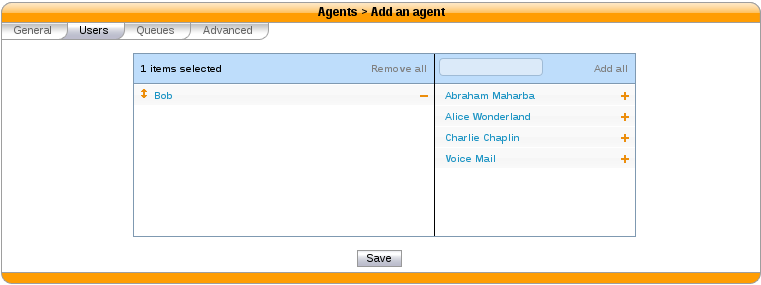
- Associate the user to the agent in the Users tab
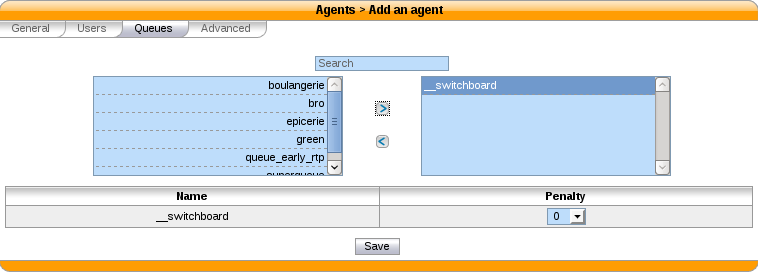
- Assign the Agent to the Switchboard Queue (and ONLY to the Switchboard queue)
Send Incoming Calls to the Switchboard Queue
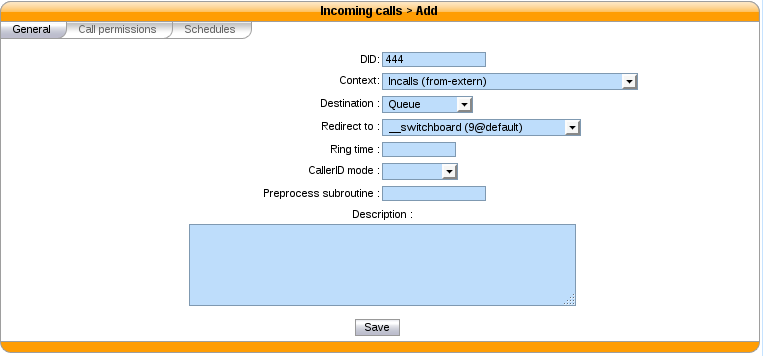
Incoming calls must be sent to the Switchboard queue to be distributed to the operators. To do this, we have to change the destination of our incoming call for the switchboard queue.
In this example, we associate our incoming call (DID 444) to our Switchboard queue:
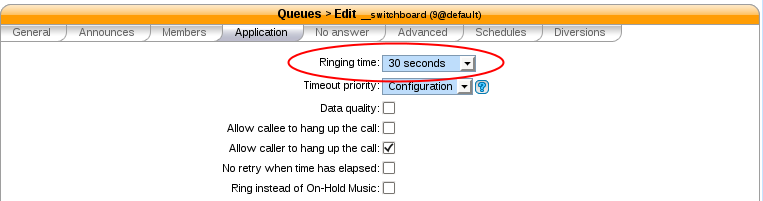
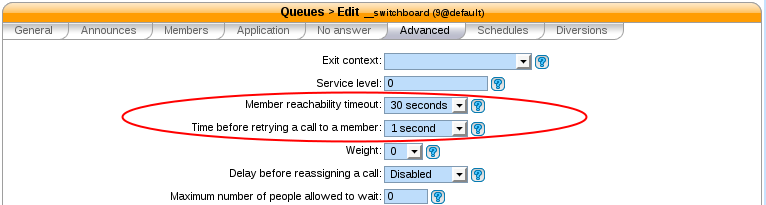
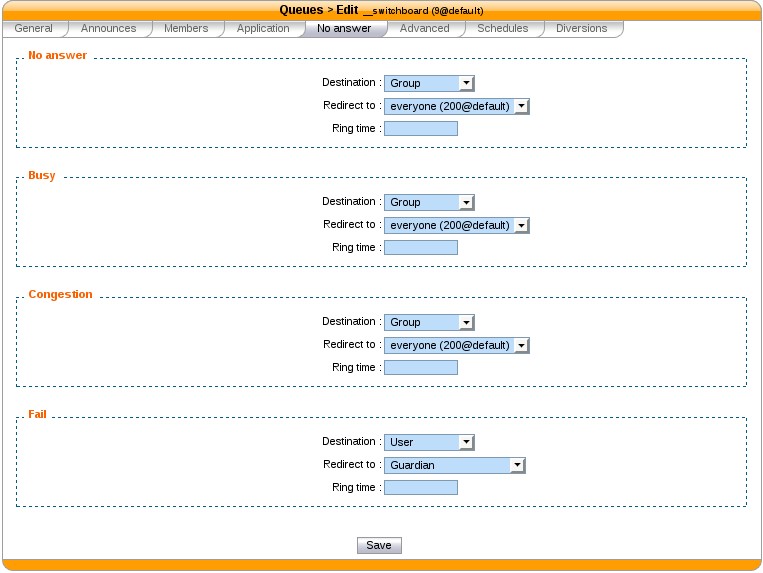
Set “No Answer” Destinations on the Switchboard Queue
When there are no operators available to answer a call, “No Answer” destinations should be used to redirect calls towards another destination.
You also need to set the timeout of the Switchboard queue to know when calls will be redirected.
The reachability timeout must not be disabled nor be too short.
The time before retrying a call to a member should be as low as possible (1 second).
In this example we redirect “No Answer”, “Busy” and “Congestion” calls to the everyone group and “Fail” calls to the guardian user.
You can also choose to redirect all the calls to another user or a voice mail.
XiVO Client configuration
Directory xlet
The transfer destination is chosen in the Directory xlet. You must follow the Directory Xlet section to be able to use it.
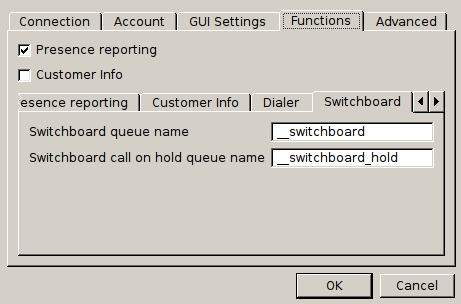
Configuration for multiple switchboards
The above documentation can be used for multiple switchboards on the same XiVO by replacing the __switchboard and __switchboard_hold queues name and configuring the operators XiVO client accordingly in the window.
Usage
Warning
The switchboard configuration must be completed before using the switchboard. This includes :
- Device, User, Agent and Queues configuration (see above),
- Directory xlet configuration (see Directory Xlet)
If it’s not the case, the user must disconnect his XiVO client and reconnect.
The XiVO Client Switchboard Profile
When the user connects with his XiVO Client, he gets the Switchboard profile.
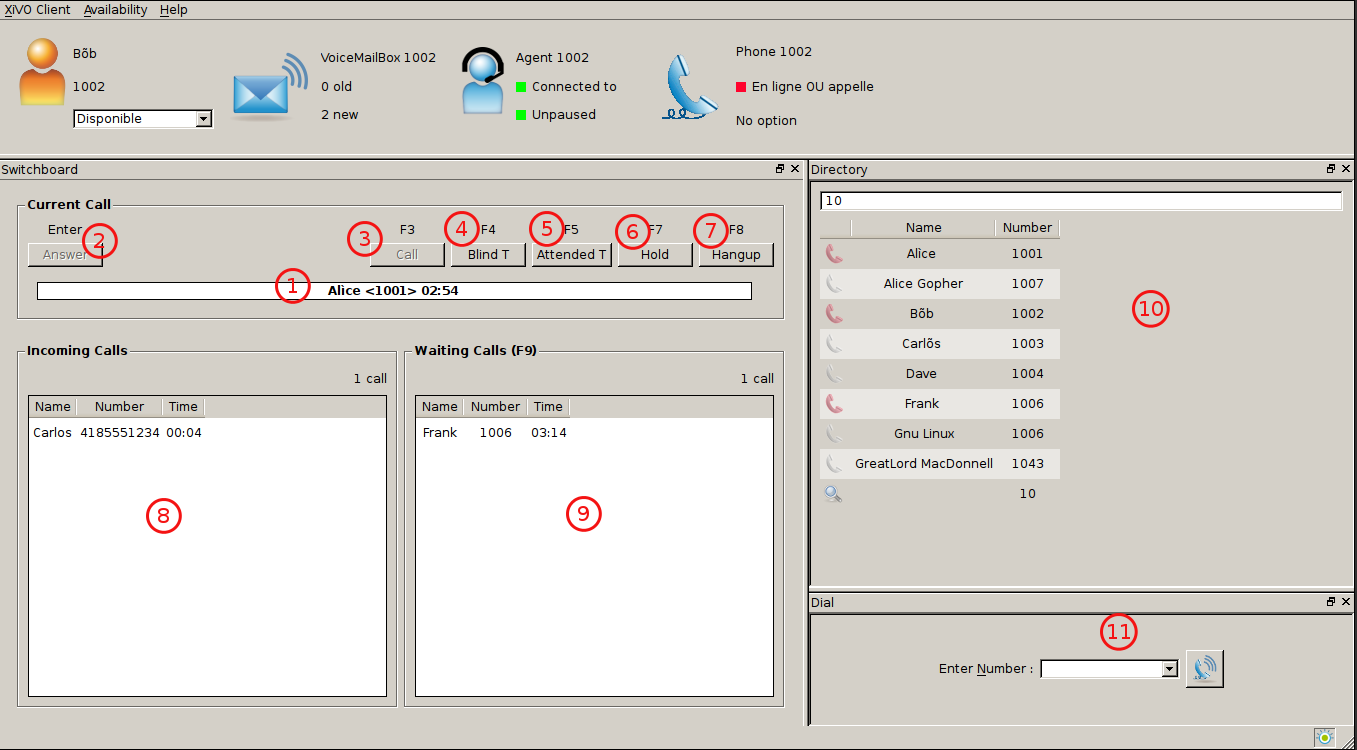
- Current Call frame
- Answer button
- Call button
- Blind transfer button
- Attended transfer button
- Hold button
- Hangup button
- Incoming Calls list
- Waiting Calls list
- Directory Xlet
- Dial Xlet
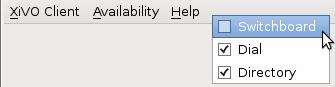
Note
If you don’t see the Switchboard Xlet, right-click on the grey bar at the right of the Help menu and check Switchboard:
The operator can login his agent using a function key or an extension to start receiving calls.
Call flow
Answering an incoming call
When the switchboard receives a call, the new call is added to the Incoming Calls list on the left and the phone starts ringing. The user can answer this call by:
- clicking on any call in the list
- clicking the Answer button
- pressing the Enter key
Note
The XiVO Client must be the active window for the keyboard shortcuts to be handled
The operator can select which call to answer by:
- clicking directly on the incoming call
- pressing F6 to select the incoming calls frame and pressing the up and down arrow keys
Selecting a call to answer while talking will not answer the call.
Once the call has been answered, it is removed from the incoming calls list and displayed in the Current Call frame.
Making a Call
The switchboard operator can do the following operations:
- Press the Call button or press F3
- Search for the call destination in the directory xlet
- Press to confirm the selection and start the call
Hanging Up a Call
The switchboard operator can hang up its current call by either:
- Clicking the Hangup button
- Pressing the F8 key
If the operator has placed a new call via the Directory or Dial xlet and that call has not yet been answered, he can cancel it in the same way.
Distributing a call
Once the call has been answered and placed in the current call frame, the operator has 3 choices:
- transfer the call to another user
- using the Blind transfer button or the F4 key.
- using the Attended transfer button or the F5 key
- put the call on hold using the Hold button or the F7 key
- end the call using the Hangup button or the F8 key.
Transferring a call
Transfer buttons allow the operator to select towards which destination he wishes to transfer the call. This is made through the Directory xlet. For defails about the xlet Directory usage and configuration see Directory Xlet.
Once the destination name has been entered, press Enter. If multiple destinations are displayed, you can choose by:
- double-clicking on the destination
- using Up/Down arrows then:
- pressing Enter
- pressing the transfer button again
Blind transfers are straightforward: once the call is transferred, the operator is free to manage other calls.
Attended transfers are a bit more complicated: the operator needs to wait for the transfer destination to answer before completing the transfer.
In this example, the operator is currently asking Bernard Marx if he can transfer Alice Wonderland to him.
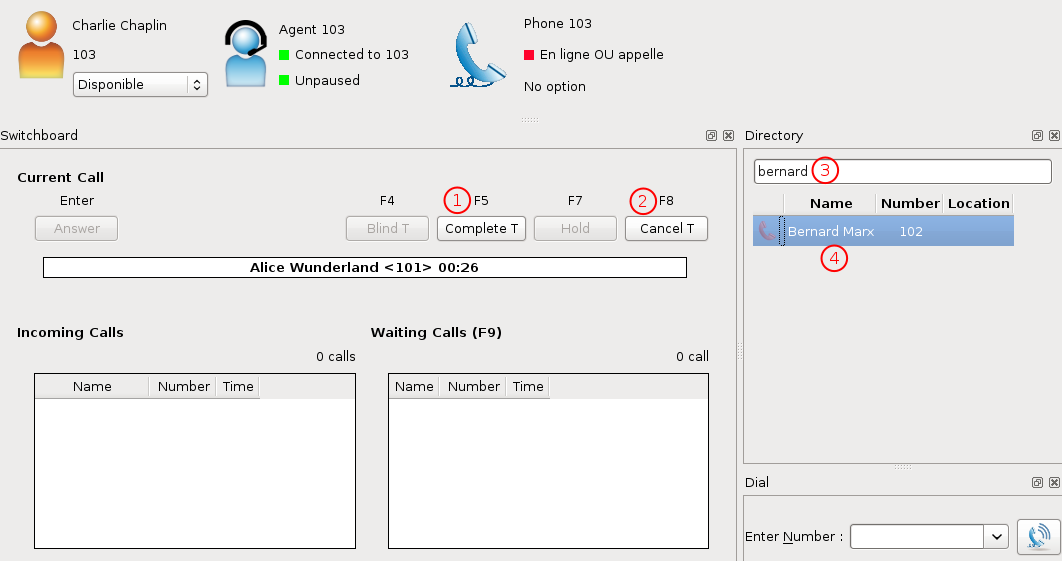
- Complete transfer button
- Cancel transfer button
- Transfer destination filtering field (xlet Directory)
- Transfer destination list (xlet Directory)
Once the destination has answered, you can:
- cancel the transfer with F8 key
- complete the transfer with F5 key
Note
The operator can not complete an attended transfer while the transfer destination is ringing. In this case, the operator must cancel the attended transfer and use the Blind transfer action.
Putting a call on hold
If the user places the call on hold, it will be removed from the Current call frame and displayed in the Waiting calls list. The time counter shows how long the call has been waiting, thus it will be reset each time the call returns in the Waiting calls list. The calls are ordered from the oldest to the newest.
Retrieving a call on hold
Once a call has been placed on hold, the operator will most certainly want to retrieve that call later to distribute it to another destination.
To retrieve a call on hold:
- click the desired call in the Waiting calls list
- with the keyboard:
- move the focus to the Waiting calls list (F9 key)
- choose the desired call with the arrow keys
- press the Enter key.
Once a call has been retrieved from the Waiting calls list, it is moved back into the Current Call frame, ready to be distributed.
