Network
You must configure your network interfaces directly from the XiVO web interface via the page.
The Voip interface is used by the DHCP server and the provisioning server.
How-to
You can only have one VoIP interface, which is eth0 by default. This interface is configured during the wizard.
The DHCP server and provisioning server, among other, use information from the VoIP interface in its configuration. For example, the DHCP server will only listen on the VoIP interface per default.
To change this interface, you must either create a new one or edit an existing one and change its type to VoIP. The type of the old interface will automatically be changed to the ‘data’ type.
Configuring a physical interface
In this example, we’ll add and configure the eth1 network interface on our XiVO.
First, we see there’s already an unconfigured network interface named ‘’eth1’’ on our system:

Listing the network interfaces
To add and configure it, we click on the small plus button next to it, and we get to this page:
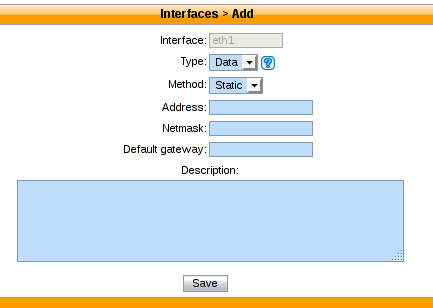
Configure physical interface
In our case, since we want to configure this interface with static information (i.e. not via DHCP), we fill the following fields:
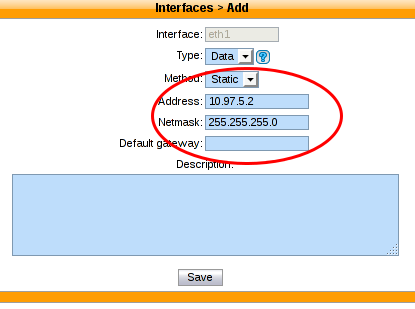
Configure physical interface
Note that since our ‘’eth0’’ network interface already has a default gateway, we do not enter information in the ‘’Default gateway’’ field for our ‘’eth1’’ interface.
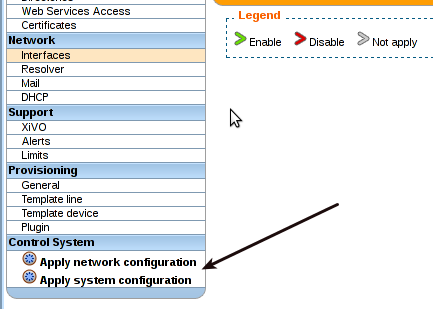
Once we click on ‘’Save’‘, the XiVO will put the ‘’Apply network configuration’’ button in bold.
To reconfigure the given network interface with the new information, you click on it.
Apply after modify interface
Adding a VLAN interface
First, we see there’s already a configured network interface on our system:

Listing the network interfaces
To add and configure a new VLAN interface, we click on the small plus button in the top right corner,

Adding button
and we get to this page:
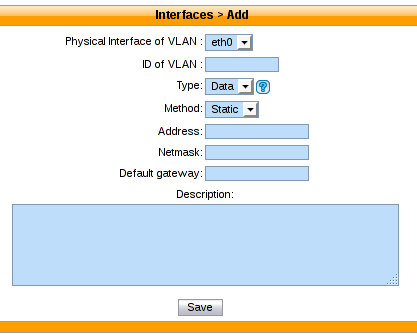
Adding a new virtual interface
In our case, since we want to configure this interface with static information:
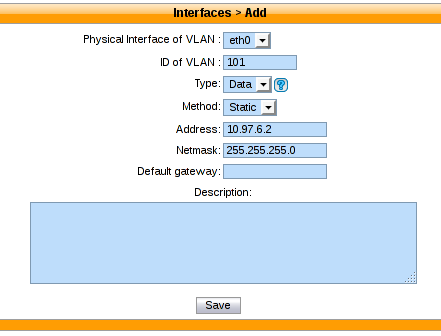
Adding a new virtual interface
Click on Save list the network interfaces:
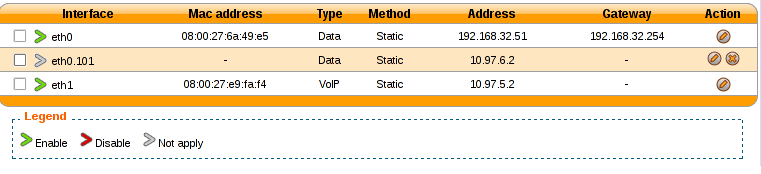
Listing the network interfaces
- The new virtual interface has been successfully created.
Note
Do not forget after you finish the configuration of the network to apply it with the button: Apply network configuration
After applying the network configuration:
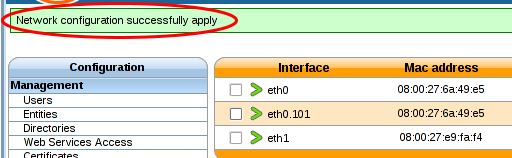
Listing the network interfaces
Add static network routes
Static route can’t be currently added via the web interface. If you want static routes in your XiVO you should do the following steps described below. It would ensure that your static routes are applied at startup (in fact each time the network interface goes up).
Create the file
/etc/network/if-up.d/xivo-routes:touch /etc/network/if-up.d/xivo-routes chmod 755 /etc/network/if-up.d/xivo-routes
Insert the following content:
#!/bin/sh

if [ "${IFACE}" = "<network interface>" ]; then
    ip route add <destination> via <gateway>
    ip route add <destination> via <gateway>
fi
Fields <network interface>, <destination> and <gateway> should be replaced by your specific configuration. For example, if you want to add a route for 192.168.50.128/25 via 192.168.17.254 which should be added when eth0 goes up:
#!/bin/sh

if [ "${IFACE}" = "eth0" ]; then
    ip route add 192.168.50.128/25 via 192.168.17.254
fi
Note
The above check is to ensure that the route will be applied only if the correct interface goes up. This check should only contain a physical interface name (i.e. eth0 or eth1 or ...). If the interface to which the route is to be applied is a VLAN interface (e.g. eth0.100 for VLAN 100) you MUST put eth0 in the test (instead of eth0.100). Otherwise the route won’t be set up in every cases.
Change interface MTU
Warning
Changing the MTU is risky. You should know what you are doing.
If you need to change the MTU here is how you should do it:
Create the file
/etc/network/if-up.d/xivo-mtu:touch /etc/network/if-up.d/xivo-mtu chmod 755 /etc/network/if-up.d/xivo-mtu
Insert the following content:
#!/bin/sh

# Set MTU per iface
if [ "${IFACE}" = "<data interface>" ]; then
    ip link set ${IFACE} mtu <data mtu>
elif [ "${IFACE}" = "<voip interface>" ]; then
    ip link set ${IFACE} mtu <voip mtu>
fi
Change the <data interface> to the name of your interface (e.g. eth0), and the <data mtu> to the new MTU (e.g. 1492),
Change the <voip interface> to the name of your interface (e.g. eth1), and the <voip mtu> to the new MTU (e.g. 1488)
Note
In the above example you can set a different MTU per interface. If you don’t need a per-interface MTU you can simply write:
#!/bin/sh

ip link set ${IFACE} mtu <my mtu>
